SSDT Tools: To benefits new features for models at the 1500 compatibility level (available since SQL 2019), you’ll need to download the latest SSDT VSIX for Visual Studio from the VS Marketplace.
This article will give you basic idea on how we can install reporting services tools and also tabular and cube models for analysis services. For more about VS SSDT Tools click here!
#1) Download and installation of Visual Studio
To work with SSDT tools we need to install visual studio first and then inside that we have to configure the extension for Repots and Tabular Models.
Step 1: Go to any browser any type “visual studio” and then click on the below Microsoft Link.

Step 2: Scroll down on this page and you will find this 3-options to download the visual studio. Select “Visual Studio” and download the required edition you like. If you want free edition or developer edition then you can select “Community 2022”

Step 3: Once downloaded the setup in to your local machine. Open the setup file.

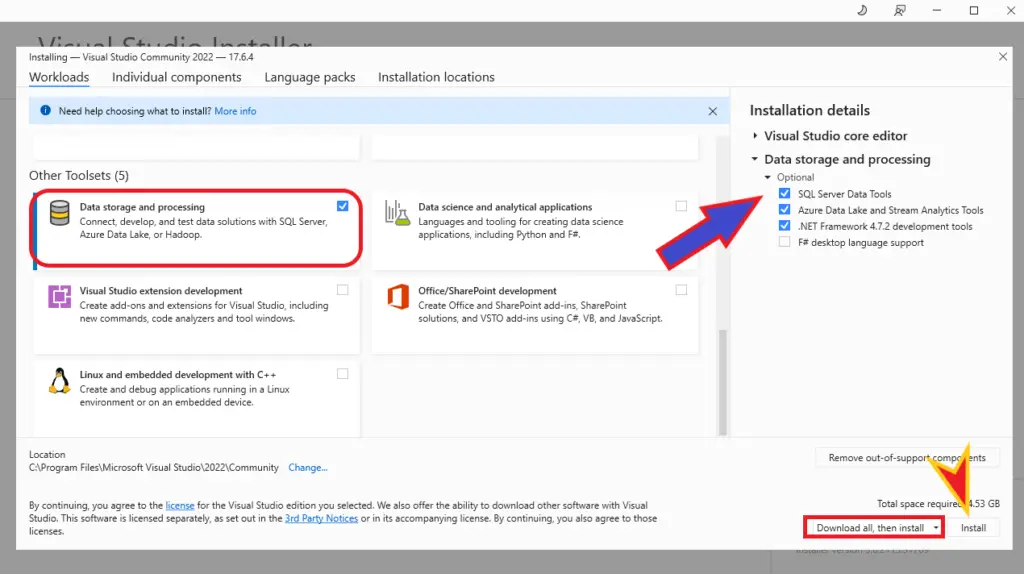
Step 4: Please select the below option carefully and don’t skip any things here. “DATA STORAGE AND PROCESSING” AND IN THE RIGHT SIDE SELECT “SQL SERVER DATA TOLLS” and then click on “Install”

Step 5: After that the setup will start downloading and install all the selected tools. Once done click on “Launch”. Once launched it will ask you to login with account. You can skip or use account depending on your situation.

#2) SSDT Tools Download & Installation
Step 1: Now from here we have to install SSDT Tools, once you open/launch the visual studio you will see this ” Continue without code ” click on that.

Step 2: In the “menu bar” you can see the “Extension” option, click on the that and select ” Manage Extension “

Step 3: In the right side search option type “Reporting” and in the middle you can see this “Microsoft Reporting Services Project” just click on download.

Step 4: In the right side search option type “Analysis” and in the middle you can see this “Microsoft Analysis Services Project” just click on download.

Step 5: Once downloaded into will be in your local machine folder path, now we will install both the Tools one by one.

Note: Please close the visual studio before installing the SSDT Tools. Also, install the both the tools 1 after the other.
Step 6: You can see in the below image I have opened both the files for installation and click on Install.

Step 7: You can see that we have successfully installed both the SSDT Tools.

Step 8: Now we will open the Visual Studio and click on “Create a New Project”

Step 9: Now here you can see that I have successfully installed all the SSDT Tools such as, Report Server Project, Tabular model, Multidimensional Project.

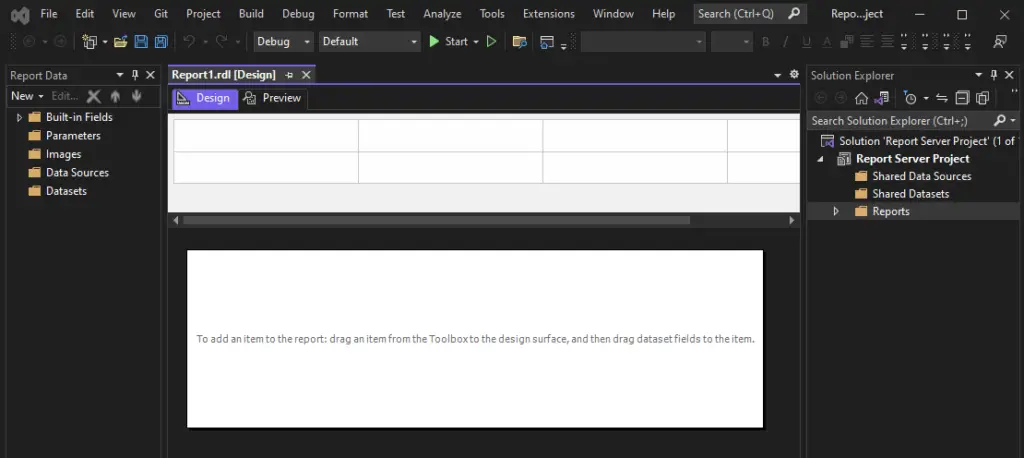
Step 10: Now here I will open one Report Server Project and give you an idea on the interface.

Conclusion:
In this article we have seen how we can download and install the visual studio with all the required SSDT Tools, if you have any doubt or concern please comment down below. Also, I have other articles as well on how to create report and publish it to SSRS or PBIRS. Below you can find all different kind of document on how to install and configure the SSRS/PBIRS.
SQL Bi Links:
- Could Not Load Folder Contents In Portal URLs – SSRSPBIRS (kingfishertechtips.in)
- SSRS/PBIRS – Install And Configure The Report Server On-Prem (kingfishertechtips.in)
- SQL Server 2022 Download, Install, Connect Using SSMS Tool (kingfishertechtips.in)
- Capture Fiddler Trace for Debugging the Network Traffic (kingfishertechtips.in)
- On-Premises Gateway: Configure/Map SQL DB To Power Bi (kingfishertechtips.in)
- Fixed Column/Row Header Make Visible In Any Report (kingfishertechtips.in)
- Self-Signed Certificate: Configure SSRS/PBIRS With SSL (kingfishertechtips.in)
- Create Local User Account/Local Admin User In Windows 10/11 (kingfishertechtips.in)
- Login With AAD/Domain/Microsoft Account To Azure VM’s/RDP (kingfishertechtips.in)