Create Local User Account: In this article we will see how we can add local admin user account in any windows. Create Local User Account/Local Admin User In Windows 10/11 or Windows Servers.
Why Local User Account?
- Some application/program will not have access to other users which are added in the VM’s.
- Also, if you use local admin account then all data or analytics will not shared with Microsoft.
- In some cases, I have seen that many applications don’t work with domain or other user account, so we have one option to create a local user account and use that to login in any application required.
- If you are using SSRS/PBIRS, then you get some error while opening the web portal URL’s states “Unable to load folder content”. The issue with solution is listed in below article below.
Create Local User Account in Windows 10?
We will see how we can create the local use account for Windows 10 and Windows 11 as well. For more info visit Microsoft website!
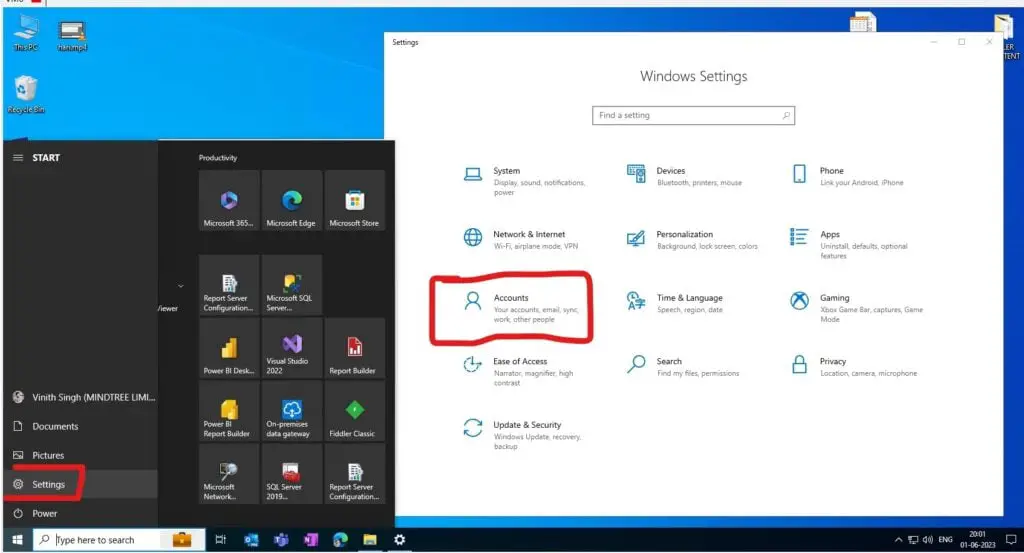
Step 1: Click on Start Button >> click on settings options >> In the windows settings dialog box click on >> Account.
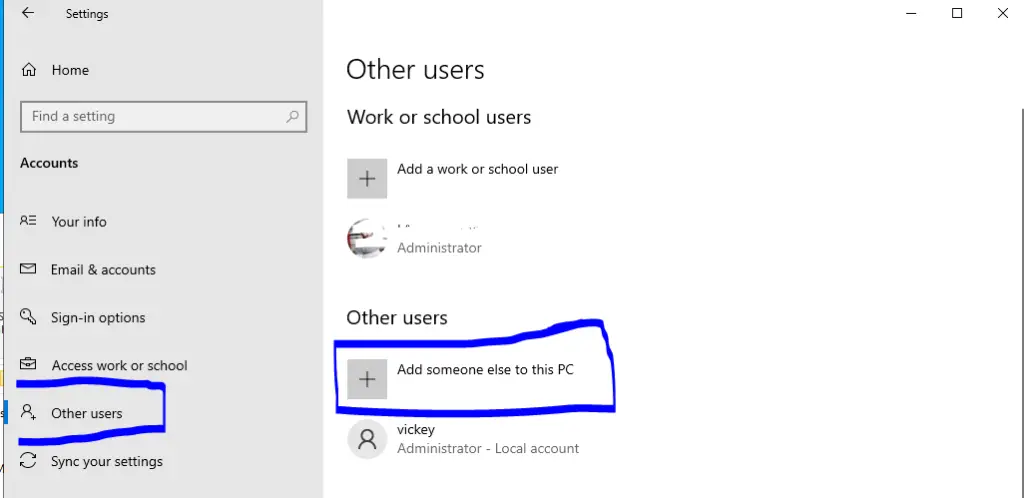
Step 2: In the left pan you can see the other user’s option >> if you see in the right box, you will find “Add someone else to this PC” Note: If you scroll down you will find one more option to add user to this VM or Machine
Step 3: Once you will click on the Add new user in the above steps, you will get this pop ups on your screen to put the Microsoft account, So here you don’t need to provide any username or password. If you could see in the below option, you will “find I don’t have this person’s sign-in information” just click on that proceed further to add username and password locally.

Step 4: Now, here you see that you will get this below option to select, so we want to create new user to login into PC or Machine. So just click on “Add a user without a Microsoft account”

Step 5: As you see in the below image, you will get one option to provide required details to create new user. Give the username and provide the password, with all the security questions and click on next to create new user locally.

Step 6: Once you are done with all the steps above you can see that “adminuser” is successfully created. Note: Still the newly created user don’t have Administrator right as you can see for my Vickey user. Now in the next step we will give admin rights.

Step 7: If you click on the “adminuser” you will get an option to >>Change account type>> just click on that and you will get one pop-up screen to change the account type. Just select Administrator and click on OK.

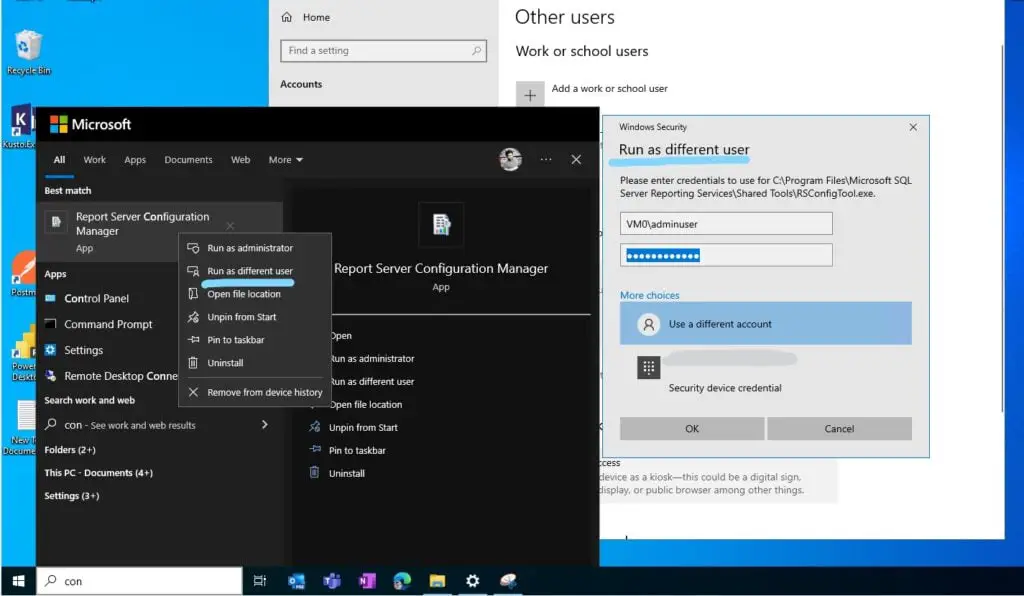
Step 8: Now the user is created successfully, and he can login to any application as you can see in the below screenshots.
Create Local User Account in Windows 11?
All the steps and procedure are same as Windows 10, but as you know the UI for the Windows 11 is changed, so I will show the way to proceed further with Windows 11.
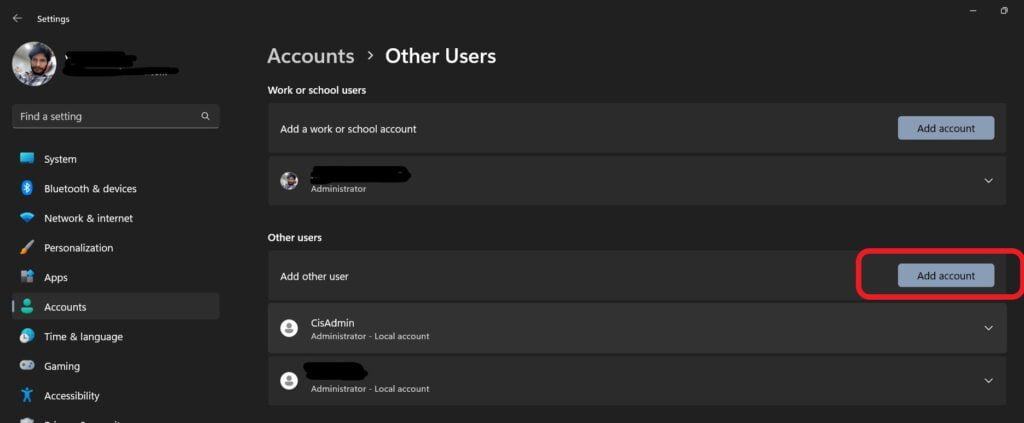
Step 1: Go to your Windows setting>> in the left pan you can see Account option just click on that and then in the right pan you can find Add Account option just click on that.
Step 2: Once you will click on the Add new user in the above steps, you will get this pop ups on your screen to put the Microsoft account, So here you don’t need to provide any username or password. If you could see in the below option, you will “find I don’t have this person’s sign-in information” just click on that proceed further to add username and password locally.

Step 3: Now, here you see that you will get this below option to select, so we want to create new user to login into PC or Machine. So just click on “Add a user without a Microsoft account”

Step 4: As you see in the below image, you will get one option to provide required details to create new user. Give the username and provide the password, with all the security questions and click on next to create new user locally.

Step 5: If you click on the “vickey” user you will get an option to >>Change account type>> just click on that and you will get one pop-up screen to change the account type. Just select Administrator and click on OK.
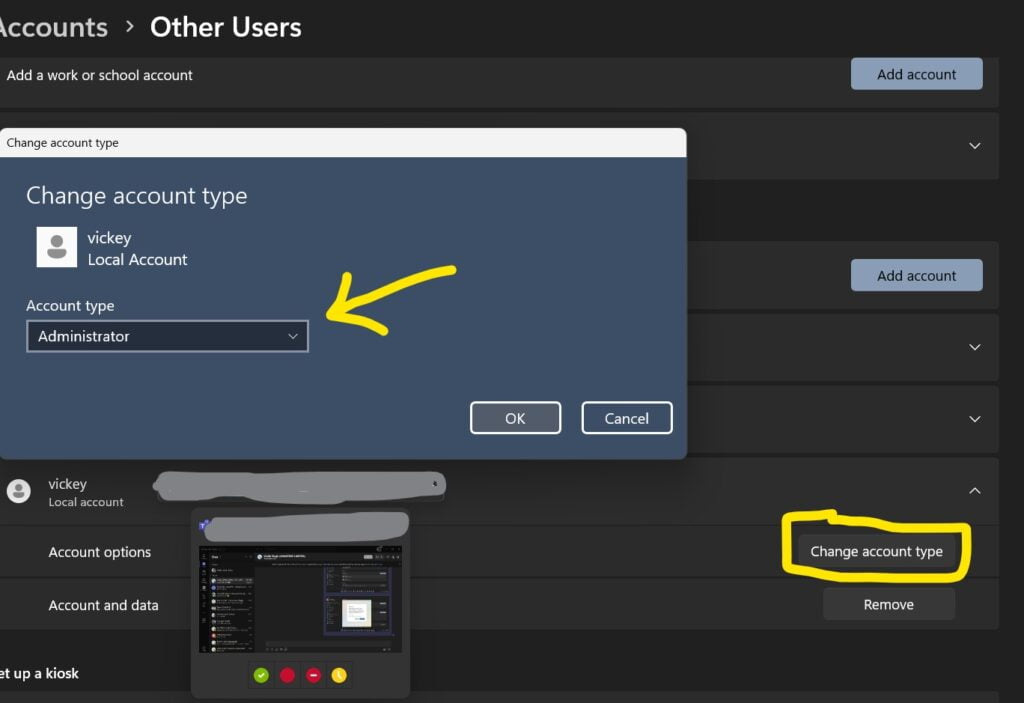
Step 6: Now the user is created successfully, and he can login to any application as you can see in the below screenshots.

New Update To Add User Locally?
Step 1: This is new update in windows 11 if you click on “add other user”

Step 2: The below will open to add user locally, now we will see how we can add admin local user with this window. Click on user>>right click on user then follow the below steps.

Step 3: Give details like username and password and click on create.

Step 4: Then go to Groups >> click on Administrator >> go to Add >> search for the user which you have created, in my case it is “vickey“. Note: “PC\vickey”, where PC is the name of the Azure VM.

Step 5: Once done you can see that my user “vickey” is the administrator now, now I can use this account to login into VM.

Other Links:
- Could Not Load Folder Contents In Portal URLs – SSRSPBIRS (kingfishertechtips.in)
- Capture Fiddler Trace for Debugging the Network Traffic (kingfishertechtips.in)
- On-Premises Gateway: Configure/Map SQL DB To Power Bi (kingfishertechtips.in)
- Fixed Column/Row Header Make Visible In Any Report (kingfishertechtips.in)
- Self-Signed Certificate: Configure SSRS/PBIRS With SSL (kingfishertechtips.in)
- Run As Different User Option Not Showing, Enable In Windows (kingfishertechtips.in)
- Create Local User Account/Local Admin User In Windows 10/11 (kingfishertechtips.in)
